Make an attractive, roomy mailbox-which might just save you or your letter carrier a few steps.
Our mailman has a tough route: he climbs a long, steep hill to deliver mail to the houses in our neighbourhood. Add a dozen inclined driveways to that and you have a very fit individual. And he's dedicated-when an item is too large for our mailbox he goes beyond the call of duty by leaving it in our back porch, which saves me a trip to the post office. I think we should initiate an annual Letter Carrier Appreciation Day. In the meantime, providing a larger mailbox will have to signal my thanks.
Canada Post requests that the minimum dimensions of a house-mounted mailbox be a shade under 6" by 6" by 14" (15 by 15 by 35 cm); free-standing rural mailboxes need to be a bit bigger: 7" by 7" by 18" (17.5 by 17.5 by 45 cm). We made ours based on the size of the most common parcel we get, giving our box an inside measurement of 8" by 9 5/8" by 14 1/2".
Having decided how big the box would be we started rooting through our scrap pile to see what wood was available, and chose nice wide pieces of pine that had some character. They were cut to the sizes listed and joined with dados, which make for weatherproof joints, keeping the contents of the mailbox good and dry. If you are locating your mailbox in a sheltered spot, you could just use butt joints and squeeze a bead of caulking along the seams to keep them weather-tight. Even with dadoed joints, a bead of caulk will give you added protection from moisture.
Because the box will be exposed to the elements it's a good idea to consider how the wood will move (expansion, contraction, cupping, etc.) If you orient the top with the heartwood up it will tend to cup downwards; the result will be that your lid is more likely to shed water. Also, the grain of the front and back boards should run horizontal so that the expansion and contraction all happens in the same direction, and you won't have problems in the joinery of the corners. (We used plywood for the bottom so grain wasn't an issue.) Another consideration is where the screws should go: if you inset them from the edges of the boards, then the boards can shrink and swell without cracking.
If you have boards with interesting features you can place them for decorative effect, but give some thought to that first: placing a knot in the middle of the lid makes it more interesting, but softwood knots can work themselves loose-you don't want the knot falling into your mailbox and letting in the weather.
We chose to leave the edges square but you might like to add curved decorative cuts on overhanging edges.
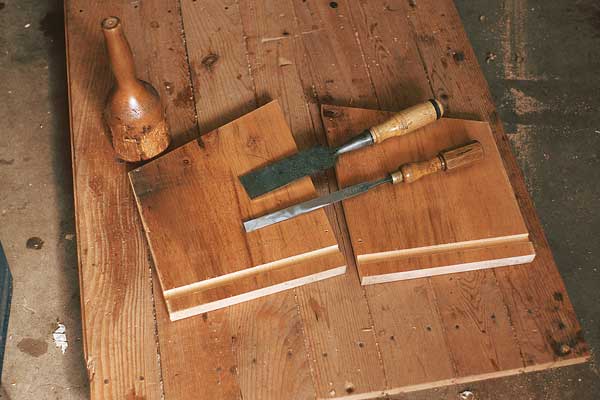
Step 1 Using a ruler and a pencil, lay out your boards from the cutting list, saving the best pieces for the top and the front. Since the angle on the top of the sides is the same, you can lay the two pieces out top-to-top and make one cut diagonally across the board. Cut the diagonal before squaring off and cutting the bottom to length; then if you make a mistake on the diagonal cut, you have some extra length to work with. Saw out all the pieces.
Step 2 Using a straight edge and pencil lay out the placement of the dados (to receive the bottom piece) on the insides of the side pieces. They are 3/4" up from the bottom, and 1/2" wide, and run all the way from front to back. Use a 1" chisel and a mallet to chisel along your pencil lines to about 1/4" depth. A bit of masking tape on your chisel blade will make sure the cut depth is consistent. Switch to a smaller chisel to clean out the wood to the bottoms of the dados. Try to make them a uniform depth, but if you go a little deeper in places, no problem; you are just trying to house the bottom panel to keep the weather out. A squeeze of silicone sealant at the end will fill in any vagaries.
A router or a table saw makes the job of cutting dados easier. If using a router, clamp a straight edge to your wood to run the router base against. On a table saw use either a dado blade, or cut to the two outside lines and clean out between them with a chisel-this will give you a nice uniform depth. An easy way to do this is to set the guard on your table saw for 11/4", make your first cut and then repeat, this time holding a 1/2" thick board between the guard and the board you are cutting. That will give you a 1/2" wide cut set in 3/4" from the edge.
Step 3 Press the bottom into the side dados to test for fit, and adjust if necessary. Then, after applying some silicone in the grooves, fit them together again, this time for good. Slide the back panel in between the sides and make it flush with the rear of the box. Holding the back panel vertical, screw through the sides and bottom into the back. If you are using hardwood-or very dry softwood, which is prone to splitting-first drill clearance and countersink holes through the sides and pilot holes into the back panel, then flip the box upside down; centre and drill a clearance and countersink through the bottom panel, and a pilot hole into the back. Then screw into the back.
 Step 4 Tip the box on its back and align the front panel so that there's a uniform 3/4" overhang on both sides and the bottom. On the underside of the front panel draw lines where it rests on the sides and bottom. Do this on both the inside and outside: this represents where you are going to cut the dados for the sides and bottom. Note that the dados for the sides will be 3/4" wide, and for the bottom 1/2" wide.
Lay the front panel on the workbench and chisel or router out the dados as you did in Step 2. These ones are "housed" dados-they do not go all the way through to the edges. Clamp the piece down while you work. Work the dados until the front fits nicely, then apply silicone and screw the front on, again pre-drilling if necessary.
 Step 5 Place a straight edge against the back panel so that it rests on the tops of both sides, and draw a line along its lower edge. This represents the inside of the bevel that you are going to plane along the top of the back panel. The other side of the bevel is the upper outside edge of the back.
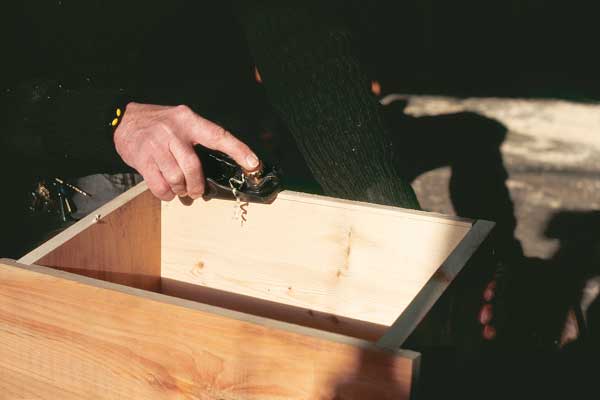
Clamp the box (using the front overhang) in a bench vise and plane the bevel on the top of the back. Use a sanding block to finish it off flush with the sides. To prevent the outside corners of the side panels from tearing out as you work the rearmost bevel, chamfer the outside upper edge of the side panel by running your block plane up it a couple of times.
Plane the front panel down to the same angle. An easy way to check this is by periodically laying a straight edge along the top of either side: when you have planed a deep enough angle on the front, the straight edge will lie flat on the sides.
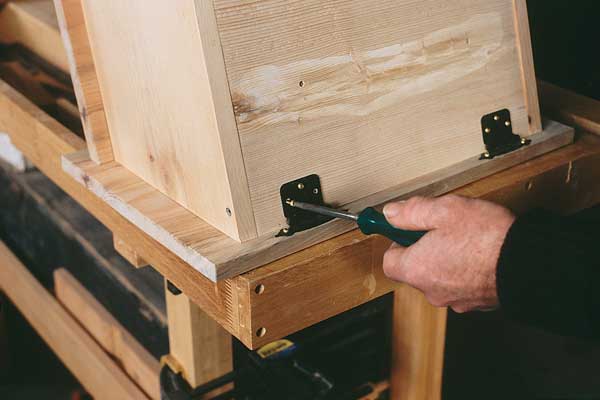 Step 6 Place the box upside down on top of the lid so that there will be a 1 1/2 " lid overhang on both sides, and close to 1" overhang at the front and back. Measure in and mark an equal distance on the back and top for the hinges. Screw the hinges in place. If the hinges bind, or the lid does not lie flat, back off some of the screws, adjust the placement of the lid, and retighten the screws.
Step 7 Use a plane or sanding block to soften sharp edges. Sand the front, top and sides. Tole paint or chip-carve away to your heart's content: there's lots of room for creativity. Note: If you're going to chip-carve the lid, for convenience first take it off the mailbox.
Instead of paint, an oil finish can be applied, and left to dry well before hanging, or for a natural, weathered finish simply leave the box untreated and it will turn silvery-grey with time.
 Step 8 To make a hanging cleat use a 14" piece of 2 by 4. You're going to slope the top two ways so that rain runs off. First, find and mark the centre, then on each end measure down 3/4". Using a straight edge, pencil a line on the front of the wood joining the centre point and each of the outer points. Taper the top edge from the centre out to the ends by sawing the top triangle off each end. (Don't be too fussy; no one's going to see it.)
Centre the cleat on the back of the mailbox and mark its outline. Remove the cleat and drill two clearance holes inside the traced outline on the back of the box. To prevent a ragged tear-out on the inside of the box, hold a piece of scrap wood against the inside while drilling through.
The cleat is now ready to fasten to the back of the box. However, before joining them, drill two more clearance holes in the cleat for the screws that affix it to the house. Their position is best determined after you look at where you are going to fasten it; there may be uneven siding or other such considerations. Once you have drilled the holes screw the cleat in the desired location on the house and then screw the mailbox to the cleat, using a washer under the head of each screw to keep it from pulling though the hole.
Cutting List
- Top: 3/4" x 11 1/2" by 19"
- Back: 3/4" x 9 5/8" H by 14 1/2" W
- Front: 3/4" x 9 1/4" H by 17 1/2" W
- Sides: 3/4" x 10 7/8" H (sloping down to 8" in front) x 8 1/2" W
- Bottom: 1/2" plywood 8 1/2" by 15"
- Cleat: 1 1/2" x 31/2" by 14 1/2"
Materials
- 3/4" board-approx. 4'
- 3/4" plywood-approx. 1' by 1 1/2'
- 16" approx. of 2" x 4"
- 1 pair kitchen cabinet door hinges with screws
- Silicone sealant
- 7 1 1/2" wood screws
- 2 2 1/2" deck screws
Tools
- Straight edge and pencil
- Measuring tape or ruler
- 1" and 1/2" chisels, mallet
- Handsaw or power saw
- Electric drill & assorted bits
- Screwdriver
- Block plane
- Sandpaper
- Level
- Bench vise
- Router with 1/2" and 3/4" bit (optional)
- Table saw with dado or narrow blade (optional)