
Get a head start on spring-build a versatile cold frame to keep early seedlings warm and snug.
We once met a man who used a south-facing hillside and well-constructed cold frames to capitalize on the warmth of winter sunlight, and his family's table was graced with fresh lettuce all year 'round.
Cold frames help to extend the growing season, but also to acclimatize seedlings started indoors to growing in the garden, and even to force bulbs. You can purchase prefabricated ones, some very high-tech with automatically opening tops for ventilation and controlling the temperature, or you can make one for yourself as easily as forming a square with four bales of hay, covering the opening in the centre with a window or sheet of glass.
Our cold frame is somewhere in between. All you need is an old window and some lumber (see Tip page 90). We used recycled lumber: it's cheaper and there's usually plenty available (just watch for old nails when cutting.) Do not use lumber-recycled or new-that's been treated with preservatives such as creosote, which can be toxic to plants.
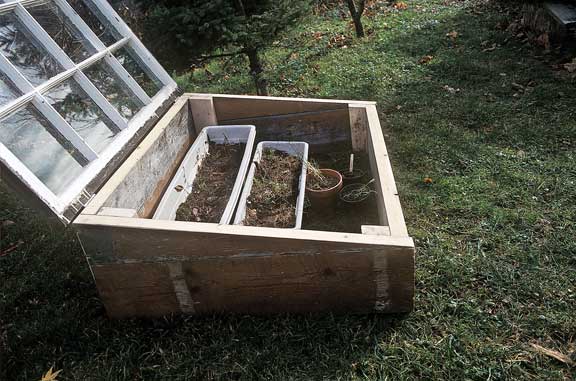
The window we chose for this project is 42" by 32" and multi-paned. This size will allow an ample number of plants to be housed. The multiple panes add both strength (because of increased framing) and ease of replacement in case of breakage.
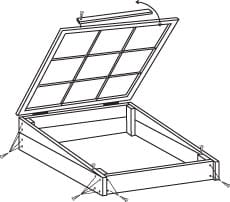
We inset the front panel of the cold frame to provide a lip by which to lift the window and prop it open, allowing trapped heat out or rain in.
Our sizing for the support frame allows the window to overhang the frame by 1/2" on two sides. This will help to slow down the deterioration of the frame by providing a "drip," so water doesn't lay on the frame's top edge. To get your outside frame dimensions, simply subtract an inch from the length and width of the window, and base your cutting list on that.
 Adjust the dimensions in the steps that follow if you're using a window that's a different size than ours. Remember to subtract double the thickness of your wood from the length of the front and back pieces, or you'll be over your desired size when you lap the joints to put it together.
Tip: recycled material know-how
- In recent years a new kind of business has sprung up, offering recycled building materials-including windows-at cut-rate prices. If you don't have an old window at hand, look under "building materials-used" in your Yellow Pages.
- Any time you tear apart a deck or shed, save any usable lumber and "sticker" it: stack the wood with stickers (smaller pieces) laid across between the lumber. This will enable the wood to dry out after rain or snow, which can prevent rot for many years.
Tools List:
- Handsaw, bandsaw, or circular saw
- Screwdrivers with bits for deck screws and hinge screws
- 1/8" drill bit for pilot holes; drill
- Hand plane
- Pencil
- Tape Measure
Materials List:
- Reclaimed window in good shape
- Two 2 x 8, 8' long
- One 2 x 6, 8' long
- One 2 x 4, 8' long
- 2 1/2" deck screws
- One pair galvanized hinges with screws
- Hook and eye
- Optional weather stripping, about 12'
Cutting list:
- Two pieces of 2 x 8, 31" long
- One piece 2 x 6, 31" long, cut in half diagonally
- Two pieces of 2 x 8, 38" long
- One piece 2 x 6, 38" long
- One piece of 2 x 4 or smaller, approximately 18" long
- Various lengths of 2 x 4 for the corners, determined by the depth of the cold frame
 1. Cut two pieces of 2 x 8, 31" long and one piece of 2 x 6, 31" long, for the sides. On the 2 x 6, draw a diagonal from corner to corner and cut along the line: these two wedges will form the slope from the back down to the front of your frame. Next, cut two more pieces of 2 x 8, 38" long and one piece of 2 x 6, 38" long, for the front and back. (Our window is 42" long; we subtracted 1" to allow for overhang, then subtracted 3", or double the thickness of our finished 2 x 8s, to allow for lapping at the corners.)
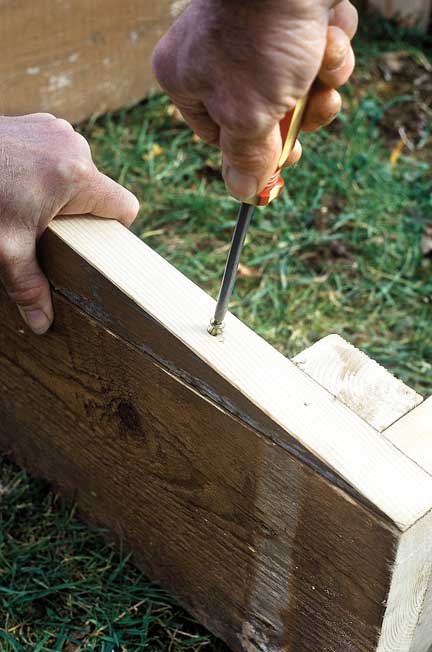
2. Build the base rectangle using the 2 x 8. Use simple, screwed butt joints for this, covering the end grain of the front and back with the side pieces. Make the back piece flush with the sides, but set the front piece back into the frame about 1".
3. On a flat surface, stand the wedge sections at both ends of the 2 x 6 back piece, making sure the back of the wedges is straight up and down. (If not, turn them over.) Trace the angle of the sides onto the ends of the back piece. Then draw a line on the front face of the back piece joining the lower edge of the bevel from end to end. Clamp it in a vise and plane this angle onto the top of the piece. This will allow the window to lie snug on the top of the frame.
4. Place the side pieces on top of the base making the edges flush and screw them through the thin ends onto the 2 x 8s. Place your screws about 9" back from the thin end so that the wood does not split (pre-drilling 1/8" pilot holes-just in the wedge pieces-will help).
5. Put the back piece on top of the rear 2 x 8 and screw through the wedge-shaped side pieces into the back piece.
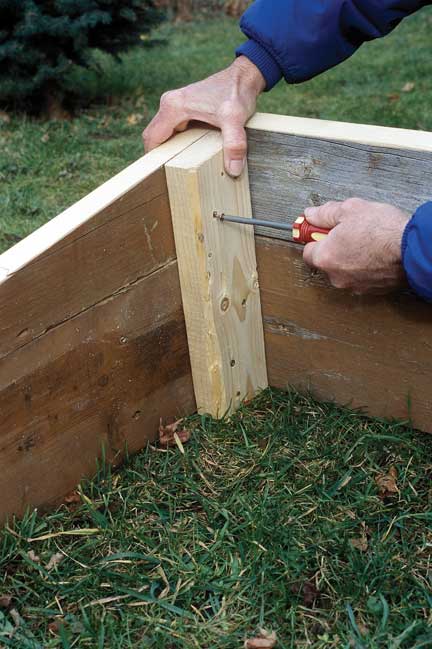
6. Next we'll brace and strengthen the corners: for each, stand a piece of 2 x 4 in the corner and trace the angle on its side. Cut to length using this angle as a guide. Clamp them in place one at a time and screw them to the frame, on two sides for each piece. Continue the bevel across the front edge of the frame; doing so will give a better fit and help keep the heat in. Use a hand plane.
7. Make sure the frame is square by measuring diagonally from corner to corner and comparing it with the other diagonal measurement (called "tramming"). A little bit of manipulation will make it square, if necessary.
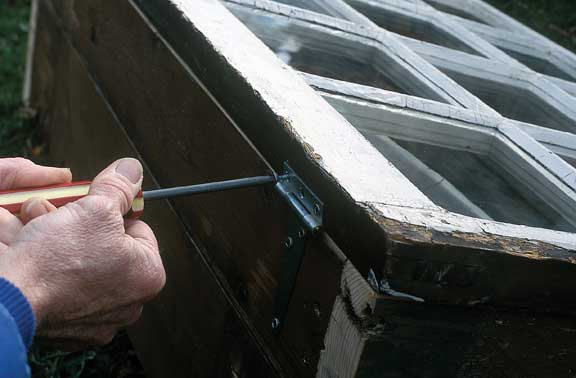
8. For a better weather-seal, staple neoprene strips or add weather-stripping around the top of your frame. You'll need to do this before attaching the hinges to get the hinge-placement right. Then, place the window on top of the cold frame with the window's edge flush with the back. Adjust it until it overhangs the same amount on the two sides. On the back of the cold frame, measure in 5" from each side and mark inside that for the hinges. Screw the hinges (flat side in) to the window and the cold frame.
9. For a prop that will function in two positions-both with the window lifted slightly, to allow air circulation but to keep rain or snow out, and in a wide-open position for moving plants or watering, cut a piece of wood 18" long.
A small piece of wood will suffice for this, but if 2 x 4 is what's available, use that. Drill a pilot hole through the stick about an inch from the end, so that the screw doesn't turn as you swing your prop, and screw it tightly to the front. Add a hook to the other end of your stick with an eye-hook on the top of the window frame to latch into. This will hold the stick in place until you need it. Resist the temptation to tap a nail into the window frame for a latch-the vibrations from hammering can loosen or crack old window panes.
10. Clean the glass and find a home for the cold frame on well-draining soil, the orientation facing south. You can further insulate the frame by banking earth, seaweed or leaf mulch around the outside.